01 The Unix Shell
14 Jan 2021This lesson introduces the shell, also known as the command line. There are many different shells: We are using the bash shell.
This lesson builds on An Introduction to the command line with Unix Basics and the Software Carpentry lesson on The Unix Shell.
- Background and Motivation
- Introductory Shell Tutorial on basic shell usage
An optional lesson on more advanced intermediate shell features is also available for you if you are interested.
Background and Motivation
As a computational scientist you have one primary tool at your hand: a computer. And like an experimental scientist, you will have to be able to interact with it, adjust it, tweak it, fix it, and generally make it do things that it has never done before.
You are probably used to interacting with a computer via a graphical user interface ("GUI") — windows, browsers, a mouse or touch screen. Although convenient, this limits you to the interactions designed into the interface. To get more out of a machine you have to talk to it more directly.
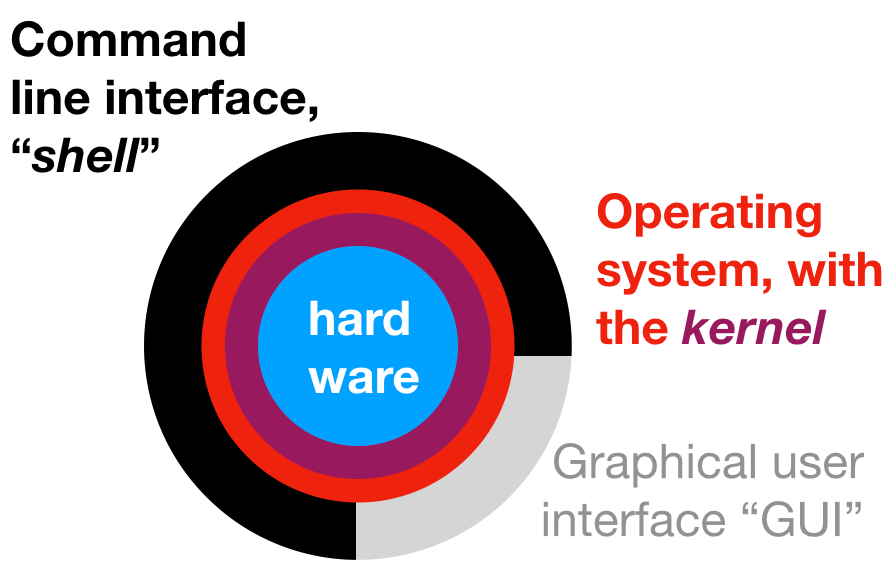
We will interact with the computer using the text-based terminal through a so-called command line interface (CLI). The user types input commands; the commands are read, executed, and output is printed. The program responsible for doing this is called the shell (because it "encloses" the operating system to simplify user interaction with it).
The shell is a program like any other but it's primary purpose is to run other programs; most of the input "commands" are in fact other programs. The shell is very good at working with the file system (files and directories), combining multiple existing tools in powerful ways, and automating tasks. On a Unix-like operating systems (typically used for high-performance computing) using the shell is a very powerful (and essential) way to interact with the computer.
Introductory Shell Tutorial
Accessing the shell
-
On a typical Linux system you open an application called terminal or xterm or kterm (or similar).
-
On macOS you open Terminal.app (in the Utilities folder in Applications).
-
On Windows we use Git Bash: Find it in the Program menu under All Programs/Git/Git Bash
Shell prompt
You should be greeted by the prompt, which can look like this
$
with the cursor as an underline or block showing that you can type. Often your prompt is more elaborate, e.g.
dvader@deathstar.empire.gov ~$
Executing commands
Commands are executed by typing the name of the command (typically an abbreviated English word like cd for "change directory", ls for "list", but also python for the Python interpreter) and then finishing with return (or enter).
Type
whoamiand hit enter. You should see your username being printed to the screen.
Type
cdand hit enter to begin the lesson. From now on, input will just be shown and you should enter it.
General syntax of a shell command
Commands generally take arguments (what to operate on, required) and options (modify the standard behavior, optional).
command_name -v -o optarg --long-opt arg1 arg2Often, omitting the argument also works and a default is assumed. You
can learn more about commands with the help function (try running just
with option -h or --help or on Linux/macOS, man command_name;
the Git Bash installation does not come with man pages but you can
use services on the web such as the
Debian man pages).
Navigating Files and Directories
The operating system manages access to files and directories in the file system (typically, the stuff that you see on your disk).
- files = documents, data, pictures, …
- directory = "folder"; may contain any number of files or other directories
Instead of using your graphical File Explorer or Finder we want to use shell commands to
- move around the file system
- get information about files and directories
- specify the location of files and directories
Commands
pwd(print working directory)ls(list directory)cd(change directory)
Paths
A path consists of directory names separated by forward-slashes
"/" and possibly a final file name.
/(the actual name of the "root" directory)/home/dvaderor/Users/dvader/usr/bin/nanobooks.txt/home/dvader/Documents/deathstar/weaknesses.pdfDocuments/deathstar/weaknesses.pdf
Paths starting with / are called absolute paths; anything else is
a relative path, starting from the current working directory (check
with pwd).
Special directory names:
.is the current directory (e.g.,./Documents)..is the parent directory (e.g.,../../home/dvader/..)~is the home directory (only when leading the path, e.g.,~/Documents)
Location in the files system: pwd
Assume user dvader has the following directory layout in his home
directory /home/dvader 1:
/home/dvader/
	     Documents/
		      deathstar/
			       weaknesses.pdf
			       electrical_bill.dat
		      work/
	     data/
		      planets.dat
		      bases
When Mr Vader logs in he starts in his home directory, /home/dvader. He can
run pwd to "print the working directory":
pwdwhich shows /home/dvader.
Activity: Find Your Home
- Open Terminal
- Type
pwd
and hit enter. Note the directory name: this is your home directory.
- share your home directory name (copy and paste into the chat)
Listing file system contents: ls
If he executes ls ("list") he will see something like
Documents
data
Activity: List Your Home directory
- open a terminal (or use the open terminal from the last exercise)
- Type
ls
- Compare the files that you see with those of your neighbor: copy and paste into the chat
Moving around the file system: cd
If he executes the cd command
cd /home/dvader/Documents/deathstarthen he will have moved to the deathstar directory; confirm with pwd!:
pwdwill print
/home/dvader/Documents/deathstar
If he runs
lshe will see
electrical_bill.dat weaknesses.pdf
The cd command took an argument, the directory to go to.
Activity: Going up
- Go to the parent directory of your home dir:
cd ..
- List the contents
ls
Activity: Going Home
- Type
cd
- Where are you now? (What command can you use to print the directory that you're in?)
More on cd
The command cd on its own always returns you to your home
directory. (It is equivalent to cd ~.)
In order to get to the data directory he could use the command cd
/home/dvader/data but instead he uses the special directory ..
(which means "the directory above this one"):
cd ../../dataA second special directory is . ("this directory"). . and ..
are understood by all commands.
Autocompletion
- Use the
TABkey while typing: autocompletion is one of the best features of the shell! - The other great interactive feature is the history: try using the cursor-up and -down keys.
Wildcards
The shell contains a simple pattern matching syntax (wildcards or "glob patterns") to select all files that match the pattern. Commonly used patterns are
*: matches zero or more characters in a name, e.g.,*.datmatches all files ending in.dat, andreport_2021-*.txtmatchesreport-2021-11.txt,report-2021-12.txt, but notreport-2020-2.txt?matches a single character in a name, e.g.,?.jpgmatches1.jpg,a.jpg, but notab.jpg
Neither of them matches a leading . in a file name or a space or the directory separator /.
Example: List all dat files
List all "dat" files in the current directory: Use the character *
to match "any part of a file name"
ls *.datExample: List all commands with "oo" in their name
List all files containing "oo" in the /usr/bin directory (will only
work on Linux or macOS):
ls /usr/bin/*oo*Example: Delete jpg files in directories 19xx
Warning: DO NOT COPY AND PASTE ANY COMMAND LINE CONTAINING rm
WITHOUT THINKING TWICE ABOUT IT. You have been warned.
Delete all jpg images in directories from the last century
rm Pictures/19??/*.jpg(Note that 19?? matches anything that looks like a year from the
last century such as 1999, 1969, … although it would also match
19xy; the *.jpg pattern matches all files with suffix jpg.)
Example: Show all two-letter Unix commands
Show commands with exactly two letters (assuming that you have a
Unix-like OS such as Linux or macOS where the commands are located in
/bin and /usr/bin):
ls /bin/?? /usr/bin/??(Two letter commands are important — learn more about these commands,
e.g., with the three-letter command man.)
Example: Copy Jupyter notebooks to another directory
As part of working with code in this class, we will have to copy Jupyter notebooks from one directory to another directory
cp ~/PHY494-resources/10_ODEs/*.ipynb ~/PHY494/10_ODEs/Error messages
Unix commands are terse: If everything works, they say nothing. If they fail, you get a short (sometimes cryptic) error message.
Try
cd bogusThis gives
bash: cd: bogus: No such file or directory
Always read error messages!
Activity: Explore your file system
-
What does the following sequence of commands show?
cd ls -a - Go to the
bindirectory that is located in the root directory (at least on Linux and macOS) or to the bin directory in~/Anaconda3/bin(on Windows). List the files there. Did you find "cp" and "grep"? If not, see if you have/usr/bin. - What does
ls -R /show? (Try^C, i.e., press CONTROL and C at the same time…) - Try other options of
lssuch as-shor-sha. — asklsfor help! - Is there a difference between
ls -sha,ls -ash, andls -a -s -h?
Tips to make your (shell) life easy
- Use the shell's convenience features:
TABcompletion- up/down arrow to get commands that you already typed.
historyshows all the commands you typed so far- Try out
Control+R(^R) to search through your shell history. ^Aand^Ewill likely take you to the beginning and end of a line
- Use
cd ..to go up,cd ../..to go up twice etc. - Use
cd -to go to the previous directory I was in (only works forcd). - Use the tilde character
~for your home directory, e.g.cd ~/Documentsis equivalent tocd /home/dvader/Documents. - Use wildcards (
*) but test them withlsbefore using them withrm!
Creating directories and files
We want to
- create, copy, rename, and delete files and directories
- edit text files
Commands
mkdir(make directory)- your editor of choice (atom by default for the class,
nanois an alternative choice 2)
Activity: Directory structure for the class
Make a directory PHY494 in your home directory for the class and
inside it, one called 01_shell for today's lesson, using the
following sequence of shell commands:
cd ~
mkdir PHY494
cd PHY494
mkdir 01_shell
Note:
- Avoid spaces and most special characters in file names. All
letters and numbers together with underscore
_, minus sign-, and period.are ok. 3 - Plain
mkdircannot create multiple directories deep in one go unless you have the-poption available (check!).
Activity
- Inside your
01_shelldirectory, create three directories,dataandDocuments/work. - Go to
Documents/work
Creating text files with a text editor
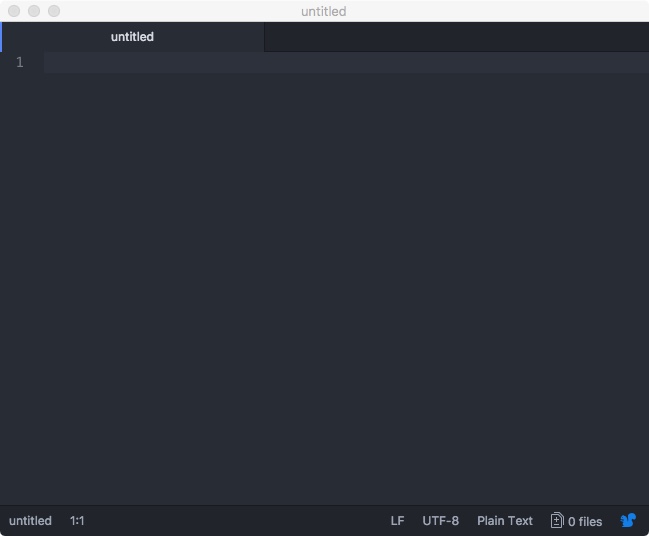
Run atom by either launching it from a menu or from the commandline 4
atomYou should see something like this:

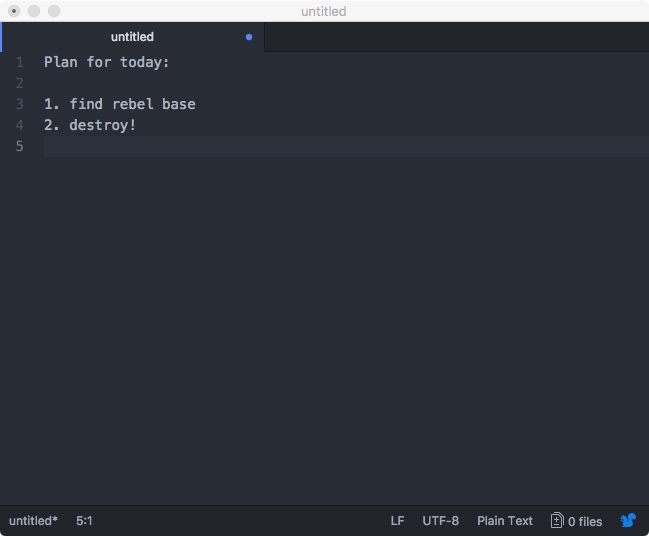
We will now create a TODO list in a file with name TODO and content
Plan for today:

1. find rebel base
2. destroy!
-
Open a new file via the menu option
File → New File
You should have a tab named untitled.
Close all the other tabs. It should look like this:
-
Type the todo list into the editor window.
-
Save it to file with name 'TODO' with menu option
File → Save
Make sure to navigate to your the
PHY494/01_shell/Documents/workdirectory.
You can hide the "project" view with the directory structure.
-
Quit atom (details depend on your operating system; find the Quit menu option either under File or Atom.
-
Check that the file is in the directory with
ls.
You can re-open the file from the command line 4:
atom TODO(Alternatively, open atom from your GUI and find the file TODO through the File
→ Open dialog.)
Activity: create a file with your editor
-
Create a file
~/PHY494/Documents/work/lesson.txtwith three lessons from today:1. computers are tools 2. the shell is powerfull 3. basic shell commands: pwd, cd, ls -
save the file and check that it is there with
ls -l ~/PHY494/Documents/work/lesson.txt
- Open the file again and add a 4th lesson regarding file editing.
Copy, rename, delete
cp(copy file,cp -rcopy recursively, including directories)mv(move, i.e. rename, also to another directory)rmdir(remove empty directory)-
rm(remove file,rm -rremove recursively (dangerous!))WARNING: There is no "Trashcan" or built in backup. Once you
rmsomething, it is gone. Be especially careful withrm -r.WARNING: Do not execute
rm -rf *. It will erase everything permanently.
Note: all these commands can also work on multiple filenames.
Activity (homework)
This is a more extended exercise in using various shell commands.
- Make a backup (call it
TODO.bak) of the TODO list with thecpcommand. - Rename
TODOtoTODO.txtwith themvcommand. -
Make a directory
notesunder thedatadirectory: You should now have a directory tree similar to~/PHY494/01_shell/ Documents/ work/ TODO.txt TODO.bak data/ notes/Check with
ls -R ~/PHY494. - Put a copy of
TODO.txtinto thenotesdirectory (usingcp). - Create a new text file
data/notes/hints.txtand write any hints for possible rebel bases into this file. - Open
TODO.txtinatomand add a note to item 1 too look in the hints.txt file. Save and exit. -
Make a copy of your
notesdirectory in your work directory:~/PHY494/01_shell/ Documents/ work/ TODO.txt TODO.bak notes/ TODO.txt hints.txt data/ notes/ TODO.txt hints.txt - Remove
data/notes/hints.txtwithrm. - Remove
data/noteswithrmdir. (Hint: Read the error message!) - Move
work/notes/hints.txtinto theworkdirectory. - Remove the useless
work/notesdirectory withrm -r(careful !)
Footnotes
-
You can also see if you have the
treecommand installed, which shows you beautiful directory trees:$ tree ~dvader /home/dvader/ ├── Documents │ ├── deathstar │ │ ├── electrical_bill.dat │ │ └── weaknesses.txt │ └── work └── data ├── bases └── planets.dattreeis typically not included with git-bash. ↩ -
Upgrading nano: If you are using
nanoas your editor then you want to enable a few useful features including syntax highlighting. The easiest way is to download the config files as the zip file nanoconfig.zip and unpack them in your home directory (curlcan be used to download a file directly instead of having to use the browser):cd curl https://asu-compmethodsphysics-phy494.github.io/ASU-PHY494/public/resources/nanoconfig.zip -O unzip nanoconfig.zipThis should create the files
~/.nanorc(which you can edit to customize further) and the directory~/.nano. ↩ -
If you must need spaces then enclose the string in single or double quotes, e.g.,
'/c/Program Files/'or"/c/Program Files". Double quotes admit shell variable expansions, single quotes do not. Note that a tilde~within quotes will not expand to the home directory! ↩ -
If you cannot start
atomfrom the commandline, go back to Setting up the Environment: Testing: editor (atom) and follow the steps described there. ↩ ↩2